Hard Light vs. Soft Light: A Photographer's Guide
Why do some photographs feel dramatic while others feel soft and gentle? Learn how to recognize hard and soft light, understand what causes the difference, and use light intentionally to shape your subject, guide the viewer’s eye, and make more compelling photographs.
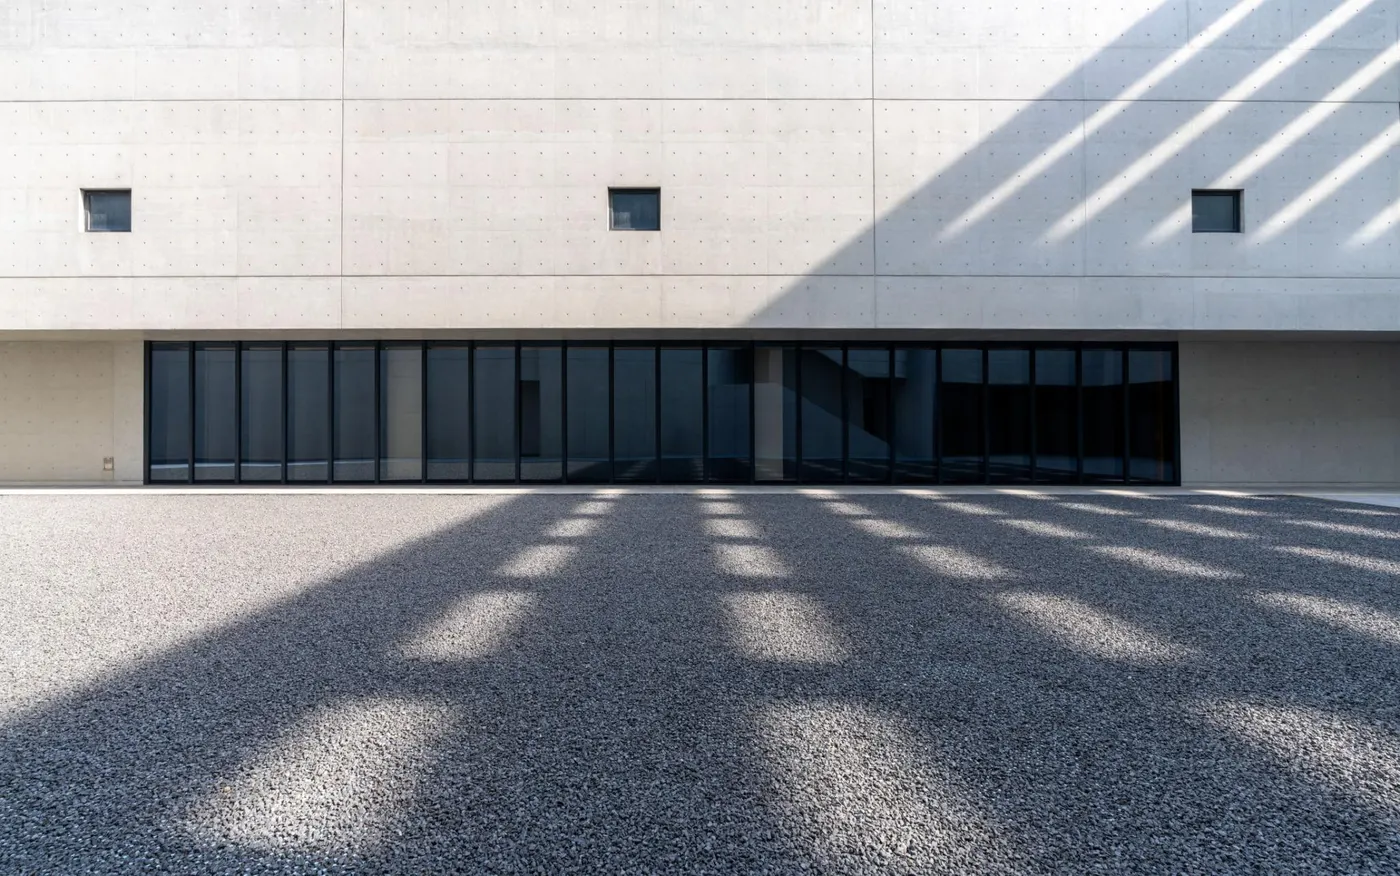
Learn to recognize the difference between hard and soft light, understand what causes it, and use both to create stronger photographs.
Two photographs can show the same subject in almost identical conditions and still feel completely different.
In one, a face is shaped by deep shadows and bright highlights. Every wrinkle and skin texture stands out. In the other, the transition from light to shadow is gentle, and the subject appears softer and more evenly illuminated.
The difference often comes down to one thing: the quality of light.
Photographers commonly describe light as either hard or soft. You may have heard that soft light is better for portraits, while hard light is harsh and should be avoided. There is some practical truth behind that advice, but it misses a more interesting lesson.
Hard and soft light are not simply good and bad. They are different ways of shaping what we see.
Once you learn to recognize them, you can make more deliberate decisions about texture, contrast, mood, and where a viewer's attention goes.
1. The easiest way to recognize hard and soft light
You don't need expensive equipment or technical knowledge to start reading light. Begin with the edges of shadows.

Hard light creates sharp shadow edges
Hard light produces shadows with clearly defined boundaries. The transition between illuminated and unilluminated areas is abrupt, often creating strong contrast between highlights and shadows.
Look for:
Sharp shadows cast by a person's nose, chin, or body.
Bright highlights beside deep, dark areas.
Pronounced surface texture, from skin and fabric to stone and pavement.
Distinct shapes created by sunlight passing through windows or between buildings.
Hard light can make a scene feel dramatic, graphic, tense, or energetic. It can also reveal distracting details and create highlights that compete with your subject.
Soft light creates gradual transitions
Soft light produces shadows with edges that fade gradually rather than stopping abruptly. The transition between light and dark is more diffuse, giving surfaces a gentler appearance.
Look for:
Gradual transitions across a face or other curved surface.
Less pronounced texture and local contrast.
More forgiving illumination for skin.
A more even distribution of tones across the subject.
Soft light often feels calm, subtle, or understated. It can be especially useful when you want the viewer to concentrate on expression, color, or the relationship between subjects rather than dramatic shadow shapes.
A useful habit: When you look at a photograph, find a shadow and examine its edge. Is the boundary crisp or gradual? This simple observation is one of the fastest ways to begin understanding the light in an image.
2. What actually makes light hard or soft?
The answer is not simply whether the light comes from the sun, a window, or a flash.
The most important factor is the apparent size of the light source relative to the subject.
In other words, how large does the light source look from the subject's position?
A large-looking source sends light toward the subject from many different directions. This fills in the edges of shadows and creates a gradual transition between light and dark.
A small-looking source illuminates the subject from a more limited range of directions. Shadow boundaries remain much more distinct.
This is why photographers often use the following rule:
The larger the light source appears to the subject, the softer the light.
The word appears matters. A physically large source can behave like a small source when it is far away. Conversely, a relatively small source can produce soft light when placed close enough to the subject.
Why the noon sun produces hard light
The sun is enormous, but it is also extremely far away. From our perspective on Earth, it occupies a relatively small area of the sky.
On a clear day, direct sunlight therefore produces defined shadows and strong contrast.
Now consider an overcast sky. Clouds scatter sunlight across a much broader area of the sky, creating a large apparent source. Shadows become softer and their edges less distinct.
The same principle explains why a window can provide beautiful soft light for a portrait, particularly when the subject is close to it.
The key isn't the label attached to the light source. It's how large that source appears from where your subject is standing.
3. Why moving a light closer can make it softer
Imagine photographing a portrait using a softbox.
You start with the softbox several metres away. Its light produces visible shadows across the subject's face.
Now move the softbox closer.
As it moves closer, it occupies a larger angle from the subject's point of view. Its apparent size increases, and the shadows become softer.
Move it farther away, and the reverse happens: the source appears smaller, so the shadows become harder.
<em>The important distinction is apparent size, not physical dimensions alone.</em>
This also explains why a bare flash can look harsh while the same flash used through a nearby diffuser can create much softer illumination. The diffuser spreads the light across a larger emitting surface.
There is one practical complication: moving a light closer also changes its intensity and how evenly it illuminates the scene. You may need to adjust exposure or reposition the light to maintain the result you want.
But the underlying principle remains useful: to soften light, make the source appear larger to your subject.
4. Hard light isn't just harshness. It can be composition.
Hard light is often treated as a technical problem to solve. But look closely at compelling street photographs, architectural images, and still lifes, and you'll find photographers using hard light as a central design element.
A beam of sunlight can divide a wall into bright and dark shapes. A sharp shadow can lead the eye toward a person. A narrow strip of light can isolate a subject against a darker background.
In these photographs, the shadows aren't incidental. They help organize the image.
Hard light can create geometry
Imagine a person walking through a patch of sunlight on a city pavement.
The sunlight creates a bright rectangle. The surrounding pavement falls into shadow. The person's silhouette intersects the bright shape.

Suddenly, the photograph is about more than a person walking. The relationship between the figure, the bright area, and the surrounding darkness creates structure.
The light establishes a visual hierarchy: the brightest area attracts attention, while the shadow shapes frame and direct the eye.
Hard light can reveal texture
Side lighting across a brick wall reveals its uneven surface. Direct sunlight across weathered skin emphasizes lines and wrinkles. A low, hard light across a tabletop creates distinct shadows beneath objects.
This can be exactly what a photograph needs when the subject's material qualities are important.
Hard light can also become a distraction
The same characteristics can work against you.
A bright patch in the background may attract more attention than the subject. A strong reflection may pull the eye away from the main action. Uncontrolled shadows can divide a photograph into competing shapes.
The question isn't whether hard light is attractive in isolation. It's whether the light strengthens the photograph's subject, structure, and visual story.
5. When soft light is the better choice
Soft light is especially useful when you want gentle transitions, controlled contrast, and fewer distracting shadow edges.
Portraits

Soft light often produces flattering portraits because it reduces the prominence of small shadows and surface texture. It can preserve a sense of facial shape without making every transition between highlights and shadows feel abrupt.
Window light, open shade, and diffused flash are common choices.
But soft light still needs direction. Light coming from the side can create gentle modeling across a face, while light coming from directly in front can flatten it. The softness of the light and its direction are two separate properties.
Still life and close-up photography
Soft light can help reveal the color and form of an object without creating overly strong reflections or distracting shadow edges.
It is particularly useful for delicate materials, translucent objects, and subjects with subtle tonal differences.
Quiet or understated scenes
Soft light can support a subdued mood by keeping contrast under control. Overcast conditions, for example, can make colors and details easier to read across a scene.
However, softness alone doesn't create a successful image. A photograph can still feel flat if the subject doesn't stand apart from the background, the composition lacks structure, or nothing guides the viewer's attention.
Soft light is a tool, not a substitute for visual decisions.
6. Hard light vs. soft light: Which should you choose?
Rather than memorizing a rule about which light is best, consider what you want the light to accomplish.
What you want to emphasize | Light to try |
|---|---|
Gentle facial transitions | Soft light |
Skin texture and surface detail | Hard light |
Strong graphic shadows | Hard light |
Subtle color and tonal differences | Soft light |
Dramatic subject separation through contrast | Hard light |
Quiet, understated mood | Soft light |
Architecture and geometric patterns | Hard light |
Even, forgiving illumination | Soft light |
These are starting points, not strict rules. A soft-lit architectural photograph can be compelling, and a hard-lit portrait can be beautiful.
The more important question is: What is the light doing to the subject, and does that help the photograph work?
7. How to make light softer or harder
You can experiment with the quality of light using equipment you already have.
To make light softer
Move the source closer. A light source generally appears larger when it is closer to the subject.
Use a larger source. A large softbox or broad window can produce gentler shadow transitions.
Diffuse the light. A diffuser spreads the light over a larger surface before it reaches the subject.
Bounce light off a large surface. A white wall or reflector can become a broad source of illumination.
Look for open shade or overcast conditions. These can provide light from a broad area of the sky rather than a small patch of direct sun.
To make light harder
Use a smaller apparent source. Bare flash or direct sunlight can create more defined shadows.
Move the source farther away. This reduces its apparent size, although it also affects illumination and exposure.
Remove diffusion. Allowing light to travel directly from the source can restore crisp shadow edges.
Look for direct sunlight. Rather than avoiding it, find a scene where its strong shapes and contrast help the composition.
When using the sun, you cannot move the source closer or farther away in any practical sense. Instead, change your position, the subject's position, the time of day, or whether the subject is in direct sun or shade.
8. A practical exercise: Photograph one subject in four kinds of light
The fastest way to understand the difference is to photograph the same subject under different conditions.
Choose something simple: a mug, a plant, a face, or an object on a table. Keep your framing as consistent as possible.
Make four photographs:

Photograph 1: Direct sunlight or bare flash
Look for crisp shadow edges, strong highlights, and pronounced texture.
Photograph 2: Open shade
Move the subject out of direct sunlight while keeping the surrounding sky visible. Notice how the shadow edges and tonal contrast change.
Photograph 3: Window light, close to the window
Place the subject near a large window. Observe the gradual transition from the illuminated side to the shadow side.
Photograph 4: The same window light, with the subject farther away
Move the subject farther from the window and compare the results. The apparent size of the window generally decreases as the subject moves farther away, although the room's other surfaces and light sources may also affect the result.
For each photograph, ask yourself five questions:
How sharp are the shadow edges?
Where is the brightest area?
Which textures become more or less noticeable?
Does the subject stand out clearly from the background?
Which version best communicates what I want the viewer to notice?
Don't just decide which photograph you like best. Try to explain why it works.
That final step is what turns an experiment into a photography lesson.
9. Learn to read light in photographs you admire
You don't have to wait until you are holding a camera to practise.
Choose a photograph you find compelling. Instead of immediately asking whether the lighting is beautiful, investigate how it behaves.
Start with the shadow edges. Then find the brightest area. Notice where the contrast is strongest and which parts of the subject are revealed or concealed.
Finally, consider how these choices affect your attention. Does the light separate the subject from the background? Does a shadow create a useful shape? Is there a bright patch that competes with the main subject?
You may discover that a photograph's impact comes from something more specific than “beautiful light.” Perhaps it is the narrow edge of sunlight across a face, the contrast between a dark figure and a bright wall, or the way soft window light preserves subtle detail.
Learning to identify those decisions helps you understand not just what you like about a photograph, but what makes it work.
The takeaway: Learn to see what light is doing
Hard light produces distinct shadow edges and can emphasize texture, contrast, and graphic structure. Soft light creates gradual transitions and can make tones and surfaces feel gentler.
Both can make compelling photographs. Both can also create problems.
The difference lies in how you use them.
Next time you take a photograph, don't ask only whether the light is good. Look at the shadows. Find the brightest area. Notice what the light emphasizes, what it hides, and where it directs your attention.
The more closely you observe light, the more deliberately you can use it.
And that is one of the most valuable skills a photographer can develop: not simply learning to control a camera, but learning to see.
At Happy Miru, photography is a craft of observation. The more you learn to recognize what makes an image work, the more possibilities you begin to see in your own photographs.